John Valentino
Advanced Notation in Finale 2002 for PC and MAC
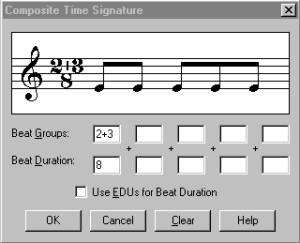
Advanced Tuplet Tool Options: Continuous X-tuplets
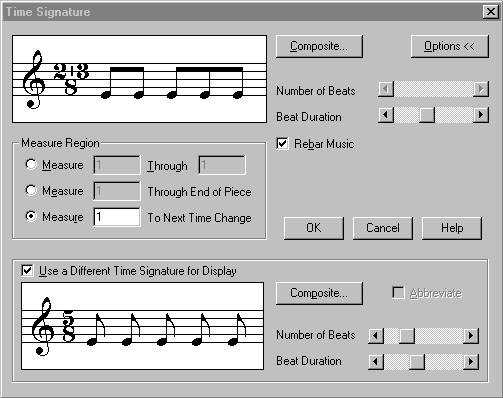
There is a problem
whenever a measure needs to contain all variable tuplets, for example a measure
in common time that needs to contain four 5-tuplets. ![]()
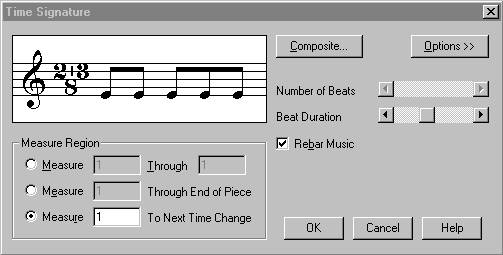
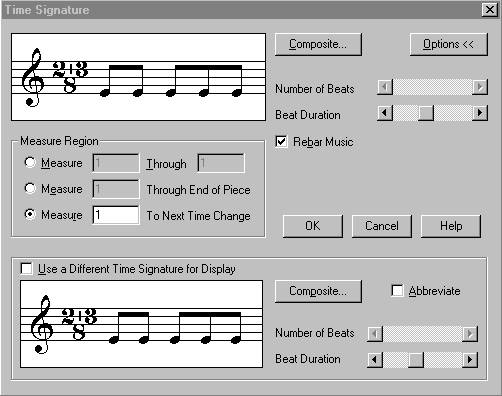
The first step is
to change the meter using the meter tool ![]() , to a meter that has enough beats in it to fit the correct
number of notes in their non-tuplet forms. Change the meter by selecting the
meter tool then double-clicking on the measure that needs to be changed. Simply
slide the 2 scroll bars until you create the desired meter, then click “ok.” In
this case, four 5-tuplets consist of twenty notes total, and in non-tuplet from
that would be twenty 16th notes. So the time signature should be
changed to 5/4, and enter twenty 16th notes.
, to a meter that has enough beats in it to fit the correct
number of notes in their non-tuplet forms. Change the meter by selecting the
meter tool then double-clicking on the measure that needs to be changed. Simply
slide the 2 scroll bars until you create the desired meter, then click “ok.” In
this case, four 5-tuplets consist of twenty notes total, and in non-tuplet from
that would be twenty 16th notes. So the time signature should be
changed to 5/4, and enter twenty 16th notes.
![]()
The
next step is to select the tuplet tool ![]() and click once on the note that needs to be
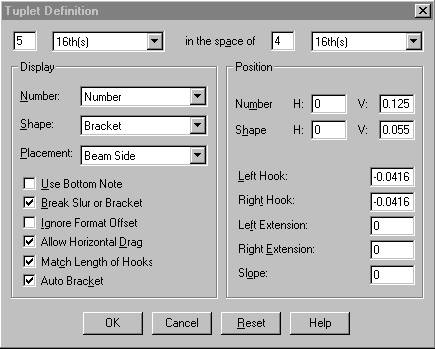
turned into a variable tuplet. A menu will appear and this is where you enter
the number of the tuplet note value that will occur during the space of a given
number of non-tuplet notes, then press “Ok.” In the case of forming 5-tuplets
set the ration to five 16th notes in the space of four.
and click once on the note that needs to be
turned into a variable tuplet. A menu will appear and this is where you enter
the number of the tuplet note value that will occur during the space of a given
number of non-tuplet notes, then press “Ok.” In the case of forming 5-tuplets
set the ration to five 16th notes in the space of four.
Then use the tuplet tool ![]() on every fifth note to create four 5-tuplets
in the 5/4 signature.
on every fifth note to create four 5-tuplets
in the 5/4 signature.

Now use the meter tool ![]() again, but this time
set the signature back to the original meter, which was common time.
again, but this time
set the signature back to the original meter, which was common time.

Advanced Tuplet Options: mixed duple and non-duple rhythms in the same beat or subdivision of a beat
First enter the number of notes in there appropriate
non-tuplet values. For example if you wanted to form, in common time, two 16th
notes followed by three triplet-16th notes, you would enter five 16th
notes.
![]()
Then use the tuplet tool ![]() on the note
that begins the tuplet. In the case of forming two 16th notes and
three triplet 16th notes, use the tool on the third 16th
note, using the appropriate ratio in the tuplet tool option box.
on the note
that begins the tuplet. In the case of forming two 16th notes and
three triplet 16th notes, use the tool on the third 16th
note, using the appropriate ratio in the tuplet tool option box.
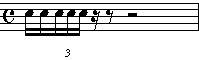
Since the double bar
extends through the entire beat, it is difficult to distinguish the rhythm. To
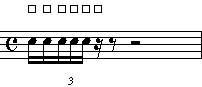
make this more readable open the special tools panel ![]() then select
the secondary beam break tool
then select
the secondary beam break tool ![]() . Now click on the measure and boxes will appear above
each of the notes.
. Now click on the measure and boxes will appear above
each of the notes.
Double-click the box
above the note that begins the tuplet, and select to break only the 16th
note beam.
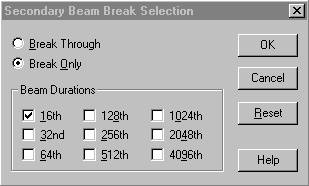
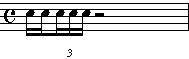
When “OK” is pressed it
will remove the 16th note beam, separating the duple from the
triplet and making the rhythm easier to read.
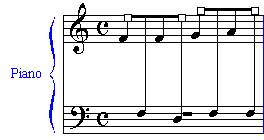
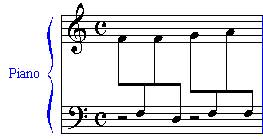
Cross-Staff Notation
The first step is to input the notes into the measure
making sure to keep all the notes in one staff.
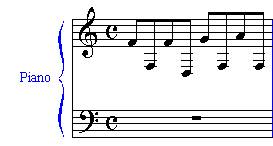
Then click on the
note-mover tool ![]() which will
make the note-mover pull-down menu an option.
which will
make the note-mover pull-down menu an option.
![]()
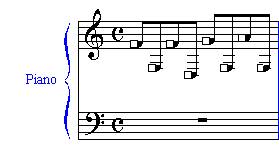
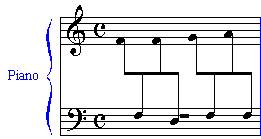
Open the pull-down menu
and select “Cross Staff.” Then click on the measure containing the notes
that need to be pushed into the other staff. This will make boxes appear over
the note-heads. Hold the shift key and click in the boxes of the notes that
need to be in the other staff.
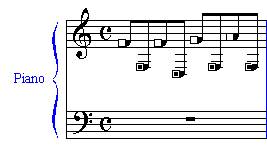
Now release the shift key
and mouse button, then click on the first selected note-head and click and drag
them into the other staff, and release the mouse button.
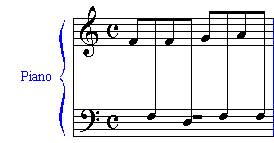
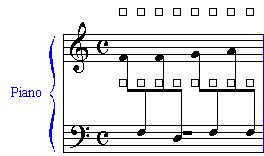
The next step is to move
the beam into the middle of the two staves. This is done by clicking on the
special tools button ![]() and
selecting the beam angle tool
and
selecting the beam angle tool ![]() . This will cause boxes to appear on both ends of
the beams. Click in either beam box and drag it to the desired location, then
release the mouse button.
. This will cause boxes to appear on both ends of
the beams. Click in either beam box and drag it to the desired location, then
release the mouse button.
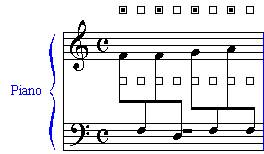
This procedure sometimes
leaves the stems on the incorrect sides of note heads, to correct this select
the special tools button ![]() and choose
the reverse stem tool
and choose
the reverse stem tool ![]() . Next click on the current measure. This will cause
boxes to appear above and below the stems of the notes. Clicking in the boxes
above the notes will cause the stems to move to the left, clicking on the boxes
below will shift the stems to the right.
. Next click on the current measure. This will cause
boxes to appear above and below the stems of the notes. Clicking in the boxes
above the notes will cause the stems to move to the left, clicking on the boxes
below will shift the stems to the right.
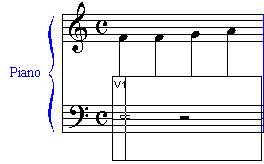
There is still a problem
in the lower staff where a whole rest, which does not serve a purpose since
both staves are acting as one, is present. Finale views the lower
measure as not having any entries at all, the cross staff notes are associated
with their original position so it is impossible to remove the whole rest
without adding an entry to make the lower staff active. So it is necessary to
add two half rests into the measure.
Select the speedy entry
tool ![]() which will
add a menu option called “Speedy.”
which will
add a menu option called “Speedy.”
![]()
Then click on the measure
containing the rests you wish to remove. A box will be created around that
measure. Align the cursor over the first rest by clicking once on it, then open
the “Speedy” pull down menu, open the “Speedy edit commands”
menu, and then select “Show/Hide entry.” Do this for the other rest as
well.